It's Winter!
I have seen various versions of this project online. I did it with a very large K-5 group of kids afterschool. We used acrylic paint on watercolour paper taped up onto boards. My "watercolour" boards are simply cut up old election chloroplast signage (FREE!)
The trees are initially "masked" off with masking tape. (Be sure to
first weaken the stickiness, by sticking to your pant leg 2x and then applying it to the watercolour paper). The "moon" is a semi circle or circle of mac tack, which is already less sticky so simply peel off the backing paper and apply.
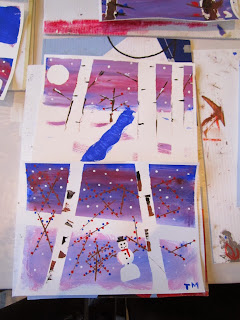 We started with double loading our brush, (ie. red, blue and white) as we talked about "tints" ...(when you add white to a colour). They weren't allowed water, and were instructed to mix the as they painted, not worrying they all blended equally.....
After the sky and land areas were painted we carefully pulled off the "tree" taped areas. The black/brown areas of the birch trees are applied later by card, not brush, dragging the black dipped cardboard across the trunk. The twigs are the card held vertically and dipped in brown paint then applied.
Berries were created by dipping a pencil tip, skewer, or brush handle in red paint and then applying it to the bush areas. Falling Snow was made similarly with white paint, while the only other white was the white of the paper originally. (this is usually the way watercolour is done).
 Some paintings also show how we taped off the horizon line, prior to painting the tint for the sky. It's interesting how some of my ultimate favourites were the semi abstract paintings some children made.
Comments
Post a Comment